写在最前面
这一篇文章其实是计划之外的,因为一开始没想要深究反射效率的问题。但是如果翻了 ButterKnife 项目文件结构的时候,会看到如下结构:
.
├── build.gradle
├── butterknife
│   ├── build
│   ├── build.gradle
│   ├── butterknife.butterknife.iml
│   ├── gradle.properties
│   ├── proguard-rules.txt
│   └── src
├── butterknife-annotations
│   ├── build
│   ├── build.gradle
│   ├── butterknife-annotations.iml
│   ├── gradle.properties
│   └── src
├── butterknife-compiler
│   ├── build
│   ├── build.gradle
│   ├── butterknife-compiler.iml
│   ├── gradle.properties
│   └── src
├── butterknife-gradle-plugin
│   ├── build.gradle
│   ├── butterknife-gradle-plugin.iml
│   ├── gradle.properties
│   └── src
├── butterknife-reflect
│   ├── README.md
│   ├── build
│   ├── build.gradle
│   ├── butterknife-reflect.iml
│   ├── gradle.properties
│   ├── proguard-rules.txt
│   └── src
├── butterknife-runtime
│   ├── build
│   ├── build.gradle
│   ├── butterknife-runtime.iml
│   ├── gradle.properties
│   └── src
├── gradle
│   ├── gradle-mvn-push.gradle
│   └── wrapper
├── gradle.properties
├── gradlew
├── gradlew.bat
├── local.properties
├── sample
│   ├── app
│   ├── library
│   └── sample.iml
├── settings.gradle
└── website
核心的工程库有这个几个:butterknife,butterknife-annotations,butterknife-compiler,butterknife-gradle-plugin,butterknife-reflect,butterknife-runtime,sample.app,sample.library 这个几个。其中依赖关系如下:
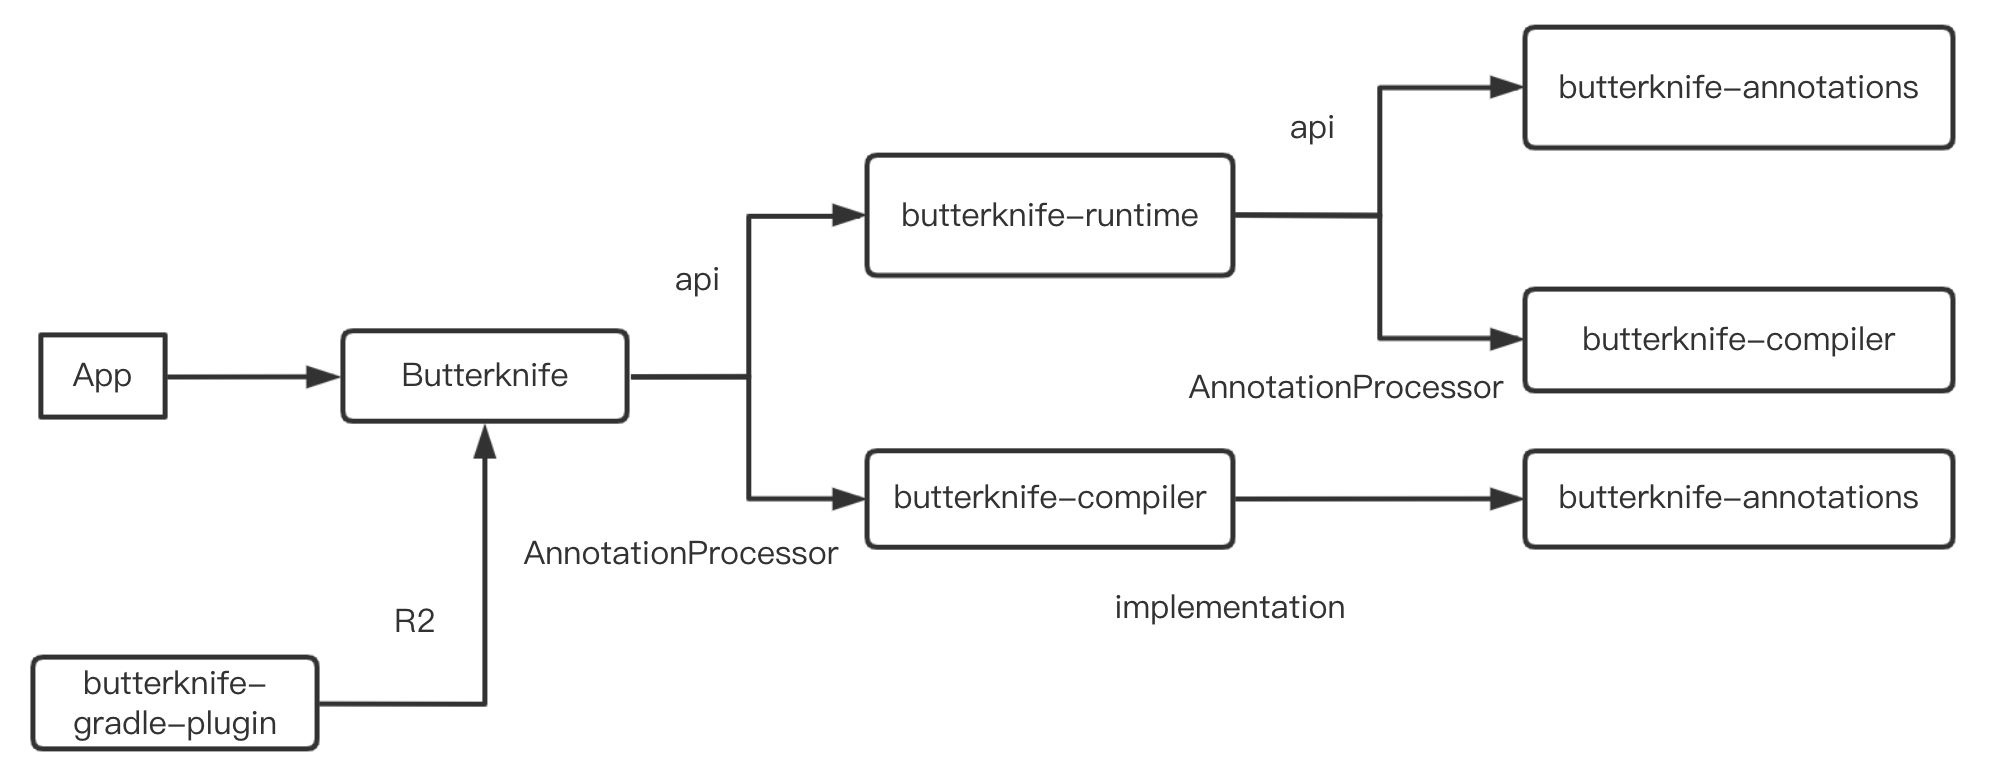
这里面只有 butterknife-runtime 库,没有在引用链中。而其实这个库有相应的 README,简而言之来说就是:
通常的 butterknife 使用编译时注解,生成中间文件,这样有更好的性能。但是 butterknife-runtime 是一个完全运行时的库,通过反射来实现的,性能会差。
那么问题来了,为啥反射的时候性能会差?本篇我们来大致看看。本篇所有的 Java 源码分析都是用的 1.8 的源码。
获取方法
上篇中,我们已经说过反射获取一个 Method 对象是怎样的:
Method getMethod(String name, Class<?>... parameterTypes);

Method getDeclaredMethod(String name, Class<?>... parameterTypes);
我们知道第一个方法是获取 自己 和 父类 所有 public 方法,第二个是获取自己所有方法,那我们就分开来看看。
getMethod
public Method getMethod(String name, Class<?>... parameterTypes)
    throws NoSuchMethodException, SecurityException {
    //校验权限
    checkMemberAccess(Member.PUBLIC, Reflection.getCallerClass(), true);
    //获取方法
    Method method = getMethod0(name, parameterTypes, true);
    if (method == null) {
        throw new NoSuchMethodException(getName() + "." + name + argumentTypesToString(parameterTypes));
    }
    return method;
}
简单粗暴,先校验权限后获取方法。我们直接看获取方法的相关内容:
private Method getMethod0(String name, Class<?>[] parameterTypes, boolean includeStaticMethods) {
    MethodArray interfaceCandidates = new MethodArray(2);
    Method res =  privateGetMethodRecursive(name, parameterTypes, includeStaticMethods, interfaceCandidates);
    if (res != null)
        return res;

    // Not found on class or superclass directly
    interfaceCandidates.removeLessSpecifics();
    return interfaceCandidates.getFirst(); // may be null
}
分了两步来判断,如果尝试获取method,如果存在就直接返回。如果没有,对接口类型进行查重返回。
看下 privateGetMethodRecursive 方法:
private Method privateGetMethodRecursive(String name,
        Class<?>[] parameterTypes,
        boolean includeStaticMethods,
        MethodArray allInterfaceCandidates) {

    Method res;
    // Search declared public methods
    if ((res = searchMethods(privateGetDeclaredMethods(true),
                                name,
                                parameterTypes)) != null) {
        if (includeStaticMethods || !Modifier.isStatic(res.getModifiers()))
            return res;
    }
    // Search superclass's methods
    if (!isInterface()) {
        Class<? super T> c = getSuperclass();
        if (c != null) {
            if ((res = c.getMethod0(name, parameterTypes, true)) != null) {
                return res;
            }
        }
    }
    // Search superinterfaces' methods
    Class<?>[] interfaces = getInterfaces();
    for (Class<?> c : interfaces)
        if ((res = c.getMethod0(name, parameterTypes, false)) != null)
            allInterfaceCandidates.add(res);
    // Not found
    return null;
}
分了三种情况:
- 查找自己的 public 方法
- 如果不是接口,同时有父类,查找父类的的方法,递归回到 getMethod0
- 如果是接口,查找接口的方法,并放到候选数组中。
先看第一个
// 获取 declaredPublicMethods,单例模式,懒启动。
private Method[] privateGetDeclaredMethods(boolean publicOnly) {
    checkInitted();
    Method[] res;
    ReflectionData<T> rd = reflectionData();
    if (rd != null) {
        res = publicOnly ? rd.declaredPublicMethods : rd.declaredMethods;
        if (res != null) return res;
    }
    // No cached value available; request value from VM
    res = Reflection.filterMethods(this, getDeclaredMethods0(publicOnly));
    if (rd != null) {
        if (publicOnly) {
            rd.declaredPublicMethods = res;
        } else {
            rd.declaredMethods = res;
        }
    }
    return res;
}


//校验函数签名是否 完全一直
private static Method searchMethods(Method[] methods,
                                    String name,
                                    Class<?>[] parameterTypes)
{
    Method res = null;
    String internedName = name.intern();
    for (int i = 0; i < methods.length; i++) {
        Method m = methods[i];
        if (m.getName() == internedName
            && arrayContentsEq(parameterTypes, m.getParameterTypes())
            && (res == null
                || res.getReturnType().isAssignableFrom(m.getReturnType())))
            res = m;
    }

    return (res == null ? res : getReflectionFactory().copyMethod(res));
}
这样自己的 public 方法都已经找到。注意最后返回的是一个 method 的拷贝。这里拷贝最终调用的就是 Method.copy 方法,所有copy出来的 method 和原 method 共用同一个 MethodAccessor。
2,3 流程是类似的。不过如果单单是一个接口的话,会有个去重的操作,猜测大概是 由于子类和父类有相同的签名的函数吧。
接下来说下 getDeclaredMethod:
public Method getDeclaredMethod(String name, Class<?>... parameterTypes)
    throws NoSuchMethodException, SecurityException {
    checkMemberAccess(Member.DECLARED, Reflection.getCallerClass(), true);
    Method method = searchMethods(privateGetDeclaredMethods(false), name, parameterTypes);
    if (method == null) {
        throw new NoSuchMethodException(getName() + "." + name + argumentTypesToString(parameterTypes));
    }
    return method;
}
直接调用了 searchMethods,直接什么都不看,就看这个类自己的 method。返回查找结果。
因此 一个Method的获取过程大致是这样的:
getMethod{
    checkMemberAccess()
    getMethod0{
        privateGetMethodRecursive{
            // 查找本身
            searchMethods(Method.PUBLIC)

            // 查找父类
            getSuperclass().getMethod0()

            // 查找接口
            getInterfaces().getMethod0()
        }
    }
}
调用方法
Method 之前我们说调用方法为 Method#invoke,那我们直接来看看这里的思路:
public Object invoke(Object obj, Object... args)
    throws IllegalAccessException, IllegalArgumentException,
        InvocationTargetException
{
    // accessableObject 的熟悉,setAccessable 时会设置这里的属性,否则要查看其权限。
    if (!override) {
        if (!Reflection.quickCheckMemberAccess(clazz, modifiers)) {
            Class<?> caller = Reflection.getCallerClass();
            checkAccess(caller, clazz, obj, modifiers);
        }
    }
    MethodAccessor ma = methodAccessor;             // read volatile

    // 获取 MethodAccessor,由其来真正进行调用
    if (ma == null) {
        ma = acquireMethodAccessor();
    }
    return ma.invoke(obj, args);
}

private MethodAccessor acquireMethodAccessor() {
    // First check to see if one has been created yet, and take it
    // if so
    MethodAccessor tmp = null;
    if (root != null) tmp = root.getMethodAccessor();
    if (tmp != null) {
        methodAccessor = tmp;
    } else {
        // Otherwise fabricate one and propagate it up to the root
        tmp = reflectionFactory.newMethodAccessor(this);
        setMethodAccessor(tmp);
    }

    return tmp;
}

public MethodAccessor newMethodAccessor(Method var1) {
    checkInitted();
    if (noInflation && !ReflectUtil.isVMAnonymousClass(var1.getDeclaringClass())) {
        return (new MethodAccessorGenerator())
            .generateMethod(var1.getDeclaringClass(),
                            var1.getName(),
                            var1.getParameterTypes(),
                            var1.getReturnType(),
                            var1.getExceptionTypes(),
                            var1.getModifiers());
    } else {
        NativeMethodAccessorImpl var2 = new NativeMethodAccessorImpl(var1);
        DelegatingMethodAccessorImpl var3 = new DelegatingMethodAccessorImpl(var2);
        var2.setParent(var3);
        return var3;
    }
}
这里可以看到,一共有三种 MethodAccessor。MethodAccessorImpl,NativeMethodAccessorImpl,DelegatingMethodAccessorImpl。
采用哪种 MethodAccessor 根据 noInflation 进行判断,noInflation 默认值为 false,只有指定了 sun.reflect.noInflation 属性为 true,才会 采用 MethodAccessorImpl。
所以默认会调用 NativeMethodAccessorImpl。
而在 NativeMethodAccessorImpl 中,invoke 方法调用如下:
    public Object invoke(Object var1, Object[] var2) throws IllegalArgumentException, InvocationTargetException {
        if (++this.numInvocations > ReflectionFactory.inflationThreshold()
                && !ReflectUtil.isVMAnonymousClass(this.method.getDeclaringClass())) {
            MethodAccessorImpl var3 = (MethodAccessorImpl)(new MethodAccessorGenerator())
                .generateMethod(this.method.getDeclaringClass(),
                                this.method.getName(),
                                this.method.getParameterTypes(),
                                this.method.getReturnType(),
                                this.method.getExceptionTypes(),
                                this.method.getModifiers());
            this.parent.setDelegate(var3);
        }

        return invoke0(this.method, var1, var2);
    }
所以当调用次数 大于 ReflectionFactory.inflationThreshold 时会使用 Java 的 MethodAccessorImpl,否则会使用 NativeMethodAccessorImpl。这是由于:
Java 版本的 MethodAccessorImpl 调用效率比 Native 版本要快 20 倍以上,但是 Java 版本加载时要比 Native 多消耗 3-4 倍资源,所以默认会调用 Native 版本,如果调用次数超过 15 次以后,就会选择运行效率更高的 Java 版本。
小结
了解了反射的原理以后,我们来分析一下反射效率低的原因。
Method#invoke 方法会对参数做封装和解封操作
我们可以看到,invoke 方法的参数是 Object[] 类型,也就是说,如果方法参数是简单类型的话,需要在此转化成 Object 类型,例如 long ,在 javac compile 的时候 用了Long.valueOf() 转型,也就大量了生成了Long 的 Object, 同时 传入的参数是Object[]数值,那还需要额外封装object数组。 而在上面 MethodAccessorGenerator#emitInvoke 方法里我们看到,生成的字节码时,会把参数数组拆解开来,把参数恢复到没有被 Object[] 包装前的样子,同时还要对参数做校验,这里就涉及到了解封操作。 因此,在反射调用的时候,因为封装和解封,产生了额外的不必要的内存浪费,当调用次数达到一定量的时候,还会导致 GC。
需要检查方法可见性
通过上面的源码分析,我们会发现,反射时每次调用都必须检查方法的可见性(在 Method.invoke 里)
需要校验参数
反射时也必须检查每个实际参数与形式参数的类型匹配性(在NativeMethodAccessorImpl.invoke0 里或者生成的 Java 版 MethodAccessor.invoke 里);
反射方法难以内联
Method#invoke 就像是个独木桥一样,各处的反射调用都要挤过去,在调用点上收集到的类型信息就会很乱,影响内联程序的判断,使得 Method.invoke() 自身难以被内联到调用方。参见 https://www.iteye.com/blog/rednaxelafx-548536
JIT 无法优化
在 JavaDoc 中提到:
Because reflection involves types that are dynamically resolved, certain Java virtual machine optimizations can not be performed. Consequently, reflective operations have slower performance than their non-reflective counterparts, and should be avoided in sections of code which are called frequently in performance-sensitive applications.
因为反射涉及到动态加载的类型,所以无法进行优化。
ok,本篇只是粗浅的分析了 反射 效率为什么比较慢,很多内容参考了:https://github.com/5A59/android-training/blob/master/jvm-art/java%E5%8F%8D%E5%B0%84%E4%B8%BA%E4%BB%80%E4%B9%88%E6%85%A2.md 这篇文章,在此表示感谢。